'Buttertub technique' (gMax)
legacy-mesh to splinecage-infinity.
---------------

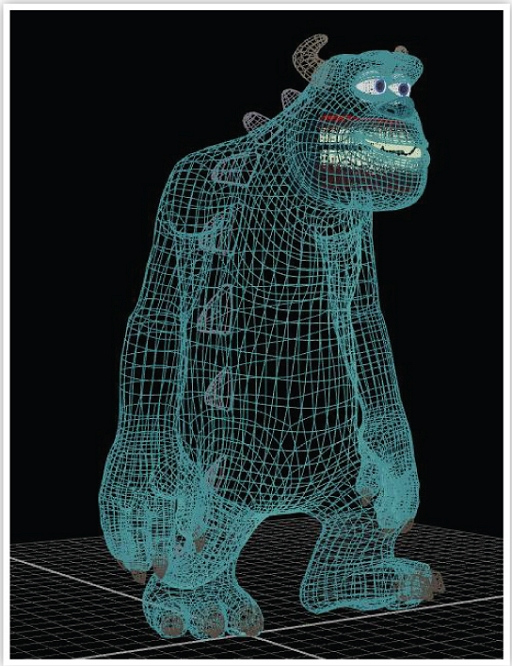
Looking at Sulley in this previz from the early 2000s seems an awful lot like a potential real-time mesh from a game in the mid 2010s. Although he's neither constructed or destined for real-time rendering, his general apparent polycount in terms of recognisable structure is roughly the same here, a few thousand quadrilaterals equating to several thousand triangles or more. What we're actually seeing is the equivalent of a spline-cage, the vertices being knots with bezier handles, the edges being splines capable of inherent axial curvatures, and quads becoming contiguous patches with triangles now but an abstract, of landscapes all unto themselves, microcosms sculpted by a multitude of displacements and other modifiers. His final render polycount is probably a few million (including fur), a wild guess considering the time Monsters Inc was being produced and entirely dependent on how close he appeared to the camera in any given shot, it's all relative. It's interesting to wonder how a Playstation 5 might render Sulley for us, since a Playstation 4 could apparently do 1995's Toy Story (some 15 million polys as an upper average) in real-time, something much more than mere thought-experiment, but a quarter-century mission that has led me to this moment.

The reason for his apparent "polycount" (actually a "resolve" of his "cage", since polys become just an abstract) is entirely about being refactored into its high-poly production asset in a perfectly smooth way, while also remaining manageable as an editable asset, to be rigged and texture-mapped, etc. However, unlike a real-time asset, an unchangeable fundamental rule, is how texture-mapping is handled. Sulley uses a lot of procedurally mapped materials using layers of blended textures, with texture coordinates assigned from axes or elements rather than being explicitly unwrapped, with inconsequential overlap. The penalty to rendering time for CGI is negligible compared to the benefits of avoiding warping and seams, it only makes sense to do it that way. Methods like multi-channel vertex-blending which are still precarious in real-time rendering today due to drawcall concerns were used very casually in CGI even back then. Sulley can be done this way because a prerendered CGI animation only needs to account for texture-memory every scanline and doesn't need to take drawcalls into account, making it virtually trivial to surface everything this way, even back then. In real-time, he would need as few materials as possible, with minimal or no blending, using explicit UV channels, otherwise it wouldn't be possible to render him at high framerates with a high polycount. This is because texture-memory is accounted for every "scene", for every frame that scene is present in memory, the complete opposite paradigm. This is the crucial difference, but as we dive into the ninth and tenth real-time generation and look back over two decades, even to Pixar CGI, is this now the only real difference, and can this difference be mitigated or even conquered?
The answer lies in the nature of a spline-cage to also use splines and knots in its texture-mapping, explicitly in a channel that is essentially a UV unwrap, but there's one problem - it isn't one, and there are a myriad of absurdly obscure problems immediately getting in our way of that. An edge is not a spline. An edge becomes a spline, and as this happens the vertices are re-indexed and worse, automatically welded, which is where the real headaches occur. It becomes impossible to coordinate two sets of matching vertices in different realms of existence, especially when they are constructed of different elements. Only the rare occasions one can change independently of another, it jumbles the order of the indices. This is unavoidable, but even when you get your UVs onto your spline-cage, the UVs themselves are not splines, you only end up with a spline-cage coupled with your old rigid mesh UVs, and that's already as a consolation. Only entire spline-cages made manually can be unwrapped so, texture-mapping that begins with splines, in other words, you can't just convert up to splines from edges. Well, not exactly. You either have rigid UVs that don't even coordinate, or an axial re-unwrap that MAX will generate for you. And I am talking specifically about 3D Studio MAX all the way up until this point, and about an issue that has separated these two worlds for over two decades now, that I have sought to resolve, not only with 3D Studio MAX, but gMax, and entirely with gMax and Blender independently. All this, with what I call the "buttertub" technique.
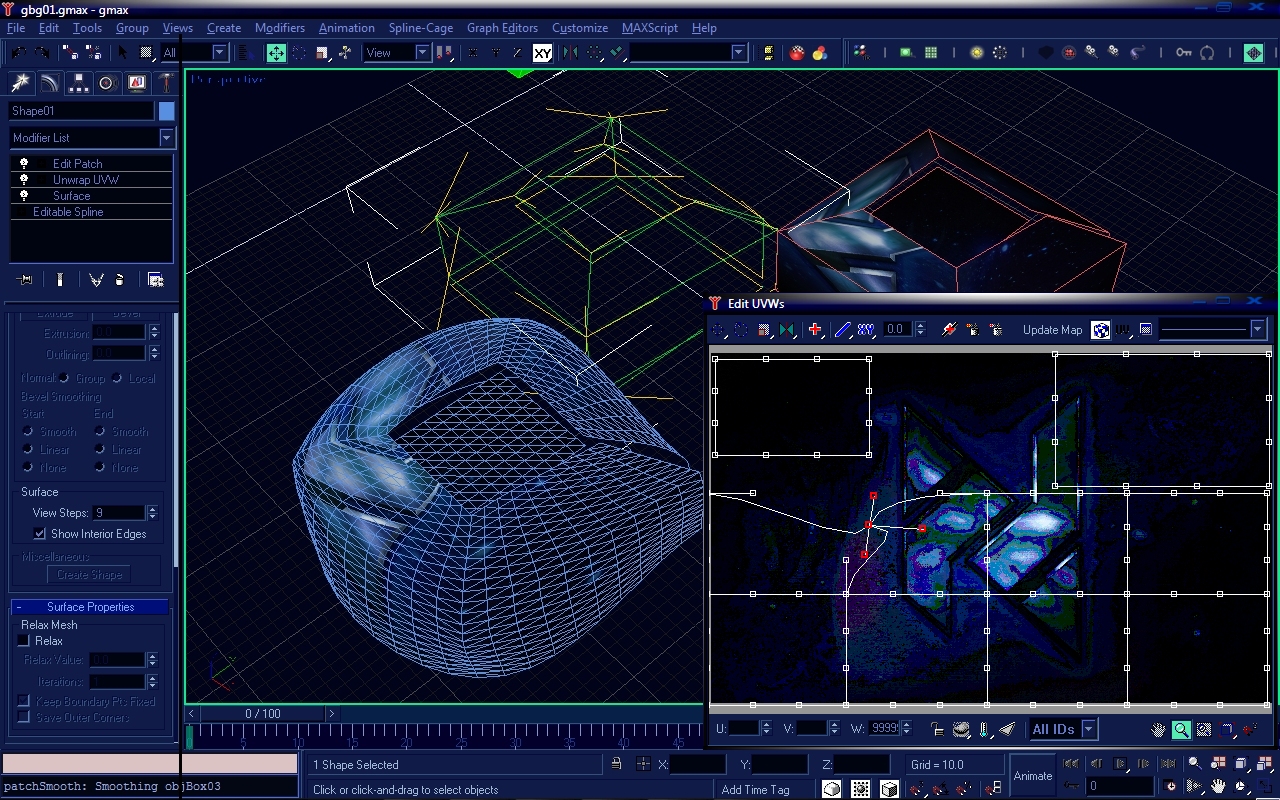
The first experiment to demonstrate the success of this technique was essentially two wide cubes merged together and unwrapped neatly, a smaller atop a larger, that when having their vertices averaged and smoothed combined with a few "Relax" modifiers, resembled a tub of butter. A large tub with a smaller lid, and an upper surface around the lid to create a ridge around the entire shape. Not only was getting the UVs onto the spline-cage (as spline-UVs) finally successful and perfectly coordinated, but the entire stack is able to reside under a governing "Edit Patch" modifier, not only giving subdivision control from both the top and bottom, but interactively applying to different elements of the entire object - vertices (knots), beziers, splines, and faces as unique patches. The "Relax" modifier is one of only a few to interactively apply to specifically selected elements of the object, and it's really as much fun to play with as it is useful. The way this approach finally works as a result is amazingly flexible, versatile, comprehensive and even fairly well behaved. After a lot of pain in recent months, the age of the spline-cage has truly arrived, infinity with no restrictions, all completely free. I refused to stop until all of this is possible with only gMax, and 3D Studio MAX is no longer a necessity to fully adapt this entire workflow.
The buttertub recipe is full of incredibly obscure and esoteric busywork, seemingly redundant and ineffective steps, even contradictory, which illustrates the struggle to scrape together each workaround in order to reach the final goal. It was intolerably difficult with 3D Studio MAX, and seemingly impossible with gMax, requiring outright miracles and happy accidents. A lot was figured out only due to random caffeine-fueled frenzies of power-of-deduction experiments, others completely by mistake. A path to being institutionalised in an asylum thankfully didn't end in such a failure, and not only is a final recipe concluded but an entire academic expedition has already sprung to life. The procedure requires dancing with gMax's miserable import and export capabilities, with a requirement for support of a full gamut of features, such as quads, smoothing, welding and UV channels. A huge ask. It does none of these things in full using only one approach, and this was already a challenge. The two flaws of gMax meet head-on, the two reasons gMax largely faded into obscurity, lousy format support and no UV unwrapping, with everyone being expected to use LithUnwrap back in those days. The way invisible edges are displayed and selected is especially confusing in gMax, and things are very easily triangulated with one wrong move, which means almost all of it is like working blindly. Some vital steps will weld, resmooth and outright refactor things, and some strange workarounds are required as an intermediary prevention. Some vital steps required features or equivalents that are missing in gMax, and by virtue of amazing luck, they exist as "MaxScripts", and this is a very important distinction from "plugins", which one automatically assumes to be searching for as a solution. Some were not found by searching, but rather dozens of hours crawling each page of blanket results, by the hundreds. Actually, very important import and export methods using MaxScript which I will get to in closing. Finally, while I mentioned the "Relax modifier" as an important tool in the whole technique, there is also a "Relax parameter" unique to the patch elements, and this is different due its position in the modifier stack hierarchy that affects the spline knots themselves directly, not just as a modifier applied later. Finally, the UV-spline unwrapping issue, the most mindbending aspect to even the casual observer, achieved by actually physically unwrapping the model itself by its own geometry as its splayed in its own UVs. That may take a few times to sink in. It literally requires unwrapping the model like origami, and this strange "UV-mesh" is then converted to splines, the saved as a UVW file, then applied to the model again after a successful surgery into its new form as a splinecage. If all that sounds confusing to just read as a summarisation, then spare some sympathy for what it took to figure all of this out, alone and under some very dark clouds.
It only now occurs to me there is an alignment of the stars, a symbiosis of classical well-established techniques from a separate medium, from pioneers of the artform itself, and how we now attempt to follow in some of those footsteps in our real-time endeavours, and do so, all while paying careful attention to exactly how Sulley was created, and learn from Sulley. An immaculate topology and refinement achieved by a sum of parts fundamentally not dissimilar from real-time mesh creation from the mid-2000s, only a few thousand triangles and considered a golden age by individual 3D artists, back when only one person could have complete intimate control over an entire model. The more I think about that, and then watch stuff like the making of Monsters Inc, the more I believe this is not just a coincidence. This is destiny, somehow mathematically sensible and logically stable. Counterwise and perhaps little understood trivia, with so much to skirt around and so very much that can possibly go wrong, an advantageous optimist might suggest opportunity for a lot to go a tiny bit wrong on purpose, for effect, and indeed there are some outrageously crazy things that happen to surfaced splines under duress, which also means the unwrapping in this case, and great use of artifacts for intentional warping and deformations. There is a lot of meat on that bone, to harness and to master, and lot of chunky documentation on the horizon all about those tricks.
The final thing to say is a huge thanks to Bobo. A giant array of different objects and elements are able to be exported from gMax as nicely delimited text-based data and imported into either gMax again or 3D Studio MAX, which although isn't so critical anymore is still nice to have, but what's even nicer is how it opens everything up to a deeper level of data management. Especially considering how all of that could be used in conjunction with the commandline server capabilities. Combined with the power of Max, combined with how capable the MaxScript language is, even in gMax, combined with the fact that the scene data is integrated right into the very MaxScript files themselves, it's just completely beyond words how exciting all the possibilities are. So much powerful content is now exposed to the whims of all manner of data management trickery, it's still unbelievable to me.

https://www.violae.net/wiki/tiki-index.php?page=Spline-cages
https://www.violae.net/wiki/tiki-index.php?page=Spline-cages(advanced)
.
.
.